

Home & Living
Kitchen
DIY & Tools
Sports & Outdoor
Technology
Garden
Baby & Child
Cars
Beauty & Care
Office
Music
Health
Pets & Animals


Kids Bicycle
Best Kids’ Bicycles in India - Reviews and Comparison 2021
We picked the kids’ bicycles in 2021 for your budget and use cases.
In the days of video games, mobile phones and tablets, it is extremely tough to get your kids out to play in the open! But bicycles have successfully broken that and managed to keep the kids excited about the outdoors.
Here is our take on the top 7 best kids’ bicycles in India to keep this interest alive and kicking. Our buyer’s guide will help you with the detailed process of buying the perfect cycle for your kids!


Kids Tricycle
Kids Cycle
UPDATED
10/21/2021
Model
Our Rating
Rating
Frame Material
Brake System
Wheel Type
Pro's & Con's
Weight
Frame Size
Gear Speed
Wheel Size
Suspension Type
Kid's Age
Min. Rider Height
Max. Rider Height
Seat Adjustability
Side Stand
Reflector
Mudguard
Carrier
Chain Cover
Horn/Bell
Lock included
Replacement Policy
Warranty Policy
Hero
Blast
B00LHRPVSG (ASIN)


Our Rating
9.6 / 10
03/2021


Steel
Caliper brakes
Hybrid tyre
Firefox
Skurrerz
B0862TFPDH (ASIN)
Our Rating
9.5 / 10
03/2021
Steel
V-brake
Mountain tyre
Firefox
Alfa
B0862TJX1T (ASIN)
Our Rating
9.4 / 10
03/2021
Steel
V-brake
Mountain tyre
Beetle
Candy
B08Q7CRKQY (ASIN)
Our Rating
9.3 / 10
03/2021
Steel
V-brake
Mountain tyre
R for Rabbit
Tiny Toes Rapid
B08KY87HNT (ASIN)
Our Rating
9.2 / 10
03/2021
Magnesium alloy
V-brake and disc brake
Mountain tyre
Speed Bird
Kids' Cycle
B08WHPPWTC (ASIN)
Our Rating
9.1 / 10
03/2021
Steel
Not mentioned
Road
Qualimate
Scooter
B08VGJSF4X (ASIN)
Our Rating
9.0 / 10
03/2021
Not Mentioned
Rear V-brake
Small wheels

Pro's & Con's
Features
Frame Material
Steel
Brake System
Caliper brakes
Wheel Type
Hybrid tyre
Weight
12.9 kg
Frame Size
12 inches
Gear Speed
Single gear
Wheel Size
16 inches
Suspension Type
Rigid
Kid's Age
5-6 years
Min. Rider Height
3 ft 8 inches
Max. Rider Height
4 ft
Seat Adjustability
❌
Side Stand
❌
Reflector
❌
Mudguard
✅
Carrier
❌
Chain Cover
✅
Horn/Bell
❌
Lock included
❌
Replacement Policy
10 days
Warranty Policy
Not mentioned
Your guides

Maitreyee Bapat
Buyer’s Guide - Best Kids’ Bicycles in India
For the love of the outdoor!
1
Features: Most important purchase criteria for the kids' bicycle
Consider these essentials while buying!
2
Use Cases: The best kids' bicycle for you
Complete nutrition for your kid!
3
FAQs: Learn more about the details
Get your doubts solved here!
4
How-To: Usage hints and care instructions for the kids' bicycle
Keeping it ready-to-go!
5
Did you know: Interesting facts, figures, and things to know about the kids' bicycle
Let's take a quick ride!
6
Our Picks: How we picked the best kids' bicycle
The best beds away from beds!
1. Features: Most important purchase criteria for the kids' bicycle
1.1 Kid's Age
It could be a bike with a stabilizer for a new learner or a child’s first mountain bike; kids of all ages can use a bicycle. Ideally, children can learn to ride a bike with stabilizers or a tricycle if they are starting at the age of two. There are balance bikes with convertible stabilizers on the back tyres, which children can use to balance and ride the bike at the initial learning stages.
It could be a bike with a stabilizer for a new learner or a child’s first mountain bike; kids of all ages can use a bicycle. Ideally, children can learn to ride a bike with stabilizers or a tricycle if they are starting at the age of two. There are balance bikes with convertible stabilizers on the back tyres, which children can use to balance and ride the bike at the initial learning stages.
1.2 Bike Size
The bike size is an essential factor to be determined before choosing a bicycle. It should be done not just on the basis of the child's age but height as well. To make the learning process more accessible, it is essential that the kid feels comfortable on the bike. Generally, the size of the bicycle is specified in inches concerning the wheel’s diameter. When the kid starts to learn bike riding, the bike's length should be ideal for his or her age and height as it will simplify the process and make it more pleasant. There are size charts available in local stores to assist you in making the right choice or you can also find the charts on the bike manufacturer’s website.
The bike size is an essential factor to be determined before choosing a bicycle. It should be done not just on the basis of the child's age but height as well. To make the learning process more accessible, it is essential that the kid feels comfortable on the bike. Generally, the size of the bicycle is specified in inches concerning the wheel’s diameter. When the kid starts to learn bike riding, the bike's length should be ideal for his or her age and height as it will simplify the process and make it more pleasant. There are size charts available in local stores to assist you in making the right choice or you can also find the charts on the bike manufacturer’s website.
1.3 Usage
As kids grow up, the bike riding experience changes. You will need to alter your choices in such cases. Based on the terrain you will ride on, there are multiple types of hybrid bikes available in the markets for cities, countryside or mountain terrain. They come with different features like an attached basket or a pannier, different kinds of mudguards, comfortable saddles and a low step-through.
Mountain bikes are the best fit for rough and uneven terrains, while BMX models are best suited for parks.
1.4 Price
Bicycles don’t come cheap and also when you are buying one for the younger ones, you know that they will outgrow it in a year or two. Therefore, price matter even more while you are buying a bicycle for growing kids.
If you are buying a cycle for kids from 5 -7 years old, then make sure the cycle’s life is around 1-2 years as the kid will soon need a new cycle. Therefore, it is excellent to stick to a reasonable budget during the buying process. Considering the budget, you can decide the mandatory features you need for the bicycle.
1.5 Weight
According to statistics, an adult bicycle's ideal weight is 20% of the user’s body weight, while the weight of a kids' bicycle is around 50% of their body weight. Comparatively, lighter bikes are made up of alloys and of course, they are easy to handle. Good bicycle manufacturing companies put a lot of thought into the bike’s design to achieve the lightest weight for the bicycle body possible.
According to statistics, an adult bicycle's ideal weight is 20% of the user’s body weight, while the weight of a kids' bicycle is around 50% of their body weight. Comparatively, lighter bikes are made up of alloys and of course, they are easy to handle. Good bicycle manufacturing companies put a lot of thought into the bike’s design to achieve the lightest weight for the bicycle body possible.
1.6 Design
In ensuring kid’s safety, bicycle design is a significant factor. Since the kid is just going to start, you can go for bicycles with a low centre of gravity because it is easier to balance and manage while riding. To have a comfortable seating position, you should opt for bikes with more extended body frames and lower minimum seat height, which is adjustable. Bicycles with a larger wheelbase design often have spacious cockpits. For better balancing and tireless rides, bikes designed with mid-rise handlebars are the most suitable. Considering the handlebars, ergonomic handlebars provide great comfort and posture while steering and keeps the knees coming in contact with the handlebars during the ride.
The following are an integral part of any bicycle design:-
● Brakes
● Wheels
● Tires
● Frame
● Dive train
● Q-factor
2. Use Cases: The best kids' bicycle for you
2.1 What bike size is ideal for my kid if he is between 85 cm to 1 meter?
You will need a 10-inch bike for your kid which is either designed like a tricycle or balance bikes.
You will need a 10-inch bike for your kid which is either designed like a tricycle or balance bikes.
2.2 Which bike is the best if my kid who is between 90 cm to 1.05 meters?
You will need a cycle that is at least 12 to 14 inch in frame size.
You will need a cycle that is at least 12 to 14 inch in frame size.
2.3 What bike size is ideal for kids with a height of 1.05 meters to 1.20 meters?
You should opt for a 16-inch bike.
You should opt for a 16-inch bike.
2.4 Which bike size is best for kids from 1.20 meters to 1.35 meters?
A 20-inch bike would suit you the best!
A 20-inch bike would suit you the best!
2.5 What bike size is ideal for 1.35 meters to 1.55 meters?
Your kid would do best with a 24-inch bike.
Your kid would do best with a 24-inch bike.
3. FAQs: Learn more about the details
3.1 How to assemble a kid's bicycle?
Follow our product guide below for assembly related queries.
Follow our product guide below for assembly related queries.
3.2 What size bike should I buy for my kid?
You can use your child's inseam to find the wheel size. Usually, if the child's inseam is right, it's safer to buy a larger wheel size. These offer more stability and give room for growth.
You can use your child's inseam to find the wheel size. Usually, if the child's inseam is right, it's safer to buy a larger wheel size. These offer more stability and give room for growth.
4. How-To: Usage hints and care instructions for the kids' bicycle
4.1 How to assemble a kid's bicycle?
Here is a step-by-step guide for a complete assembly of the kid's bicycle.
-
Preparation: After you have unboxed the frame and all the bike parts, set them out in a room that is large enough to occupy it and will be spacious for the process. In case you have a carpet in the area, it is recommended to cover it with a layer of newspapers to keep it from getting damaged or marked during the assembly process.
-
VVIP: If the brakes you are using are disc brakes, strictly avoid touching the brake levels until the wheels are correctly fitted and checked for any errors.
-
Remove all the packaging: In case you have plans to sell the bike, you might want to keep the box and the packaging manual safe for that purpose. You can use the internet to look at a fully assembled picture of the bike as it will give you a fair idea of what the bike will look like.
-
Gather tools: Established bike brands ideally provide you with all the tools that you need in the process inside the box, excluding a bike pump. As you will need a bike pump multiple times in the future, it is always a good idea to buy one during the bike purchase.
-
Check the fork: The front wheels are to be fitted into a part called the fork. During packaging, it is sometimes arranged inverted. Here, you can see the right way to position the front wheel properly on a fork for traditional bikes, which come with v-brakes and mountain bikes designed with suspension forks or disc brakes, as this setup is a bit more tricky.
-
Attaching the handlebars: It is critical to make sure that the handlebars are set at a perfect angle when positioned on the bike's frame.
-
Other fittings: Before fitting the seat post, check for the availability of a thin layer of grease on the part fitted into the frame. If it is not there, apply oil in amounts that will suffice to make sure the seat does not get stuck and ensures smooth movement whenever you want to adjust the saddle's height. Fit the saddle's nose aligning it perfectly with the top tube to ensure that it is fitted straight. As not doing this would make the seat uncomfortable and irritate due to friction. It is suggested to check the saddle in the lowest minimum position available and adjust it whenever needed as per the requirement. Trying to ride a bike with a high seat position for a child would not be recommended. To avoid damage, the saddle displays a minimum seat post, which should be fitted inside the frame in ideal conditions. It is essential to set the saddle concerning these measurements. It is printed on the bottom of the post inside the line, which goes around the frame. If you are needed to set the seat at the highest possible height, the child will likely outgrow the bike in terms of size. Once the saddle is being put at the correct height, it needs to be tightened in the same position. There are two possible methods, it can be done with a quick-release mechanism if available on the bike, or you can do it with a hex key. Make sure you tighten the saddle just right, not too tight or too loose, so it perfectly holds the seat in place when the kid is riding.
-
Attaching the front wheel: To make space in the box, most kids bikes will be packed with the front wheel taken off but the rear wheel attached. The first step to take before you connect the front wheel is to determine the direction of the rotation, indicated by an arrow on the tyre's sidewall. The arrow should move clockwise when facing the bike from a right-hand side view.
-
Reattaching breaks: The next step after inserting the wheels is reattaching the v-brakes. This part is slightly tricky. The metal noodle i.e. the curved metal tube which has an end in the shape of a mushroom, needs to fit precisely in the noodle holder. If this step is done incorrectly, it may cause the tyre to cause friction with brakes while rotating.
-
Tyre check: It is important to do because when a bike is in storage or being transported, the tyres can deflate. Hence, it is necessary to determine the condition of the tyres before it rides. Because the tyres are on low pressure, there are more chances that they might get punctured. It is also very burdensome to ride on tyres in such a state.
-
Adding the pedals: The pedals come with the labels ‘R’ or ‘L’ to demonstrate the left and right pedals. Look at it carefully and ensure that you are attaching the right pedal on the right side. It is necessary to align the pedal to a certain degree. The crank and the peddle should be at 90 degrees. In case this is not done correctly, it can cause problems with the threads, which is hard to fix. You should be able to fix them pretty much by hand. Then using the correct tool, tighten them up. You can also tighten both the pedals once the bike is up on its wheels. It is effortless to incorporate them to a certain extent using your hand and pull them properly with a tool at the end. This last step is crucial as loose pedals can cause problems to the threads and slip during riding leading to injuries.
-
Final checks: As a precautionary step, make sure the following parts of the bike are working correctly before the kid rides the bike:
Once you have figured that out, carefully lift the fork ends and settle them onto the wheel's axle, which is positioned in the centre of the wheel. This part also has attachments fittings to set the rotation. When the wheel is appropriately settled into the forks' ends, the axle snugs up against the upper layer of the slots. Proceed to tighten the wheel fittings using a hex key or a wheel nut or quick release mechanism if available. The wheel must be drawn to the appropriate degree, so it is strictly advised to use the right hex ket or spanner to do this job. After this process is done, grab the front of the bike, raise it in the air, move/tap, and check the tyre's top for any movements. Pay attention to the fork ends which are fitted into the wheel and check for any discrepancies. If you feel it needs to be tightened or anything done correctly, open up the fittings and refit the wheel to ensure 100% accurate settings and safety. In case the bike comes with disc brakes, you are required to precisely place the brake disc between the brake calliper and the pads. While setting the disc brakes, be careful not to touch the sides to avoid disturbing the layer of grease on the brakes which enhances the brakes' functioning.
-
Tires
-
Front and rear wheel
-
Fork
-
Handlebars
-
Brake levers
-
Pedals
-
Saddle
-
Both brakes
Generally, the gears and suspensions are already appropriately assembled by the manufacturers, but it is always better to double-check safety.
4.2 How to maintain a kid's bicycle?
1. Drivetrain cleaning: Maintaining the drivetrain, i.e. the sprocket and the bicycle chain, is extremely necessary. Regular lubrication of the chain ensures a longer lifespan and better performance of the bicycle. If this maintenance is not performed correctly, it may cause rattling sounds while riding the bike and make it very heavy to pedal. It may cause severe damage to the bike as well.
As it is costly and time-consuming to replace these parts, regular cleaning will save you some bucks. To clean and pry off the big gunks from the chainrings and the rear derailleurs, you can use disposable rags to rub it off after applying bike oil. Use a toothbrush to reach the minute pockets in the chain and the sprocket. Make it as clean as possible. After you are done, slowly rotate the pedals with the back wheel in the air while adding drops of bike oil and make sure it lubricates all the chain blocks and encircles the sprocket.
2. Check the tires: The performance of the bike is heavily dependent on the condition of the tyres. The tyres need to have the correct air pressure. If the air pressure is low, it makes riding the bike tiresome as the rider is required to apply more strength as pedalling is heavy. It is beneficial to keep a pressure gauge and air pump handy. According to the model of your bike, determine the correct pressure for your tyres. It is recommended to check the pressure of the tyres weekly or before and after long rides. Make sure the tyres always stay inflated even the bike is not used for a certain period. If you cannot do this, keep the tyres detached from the bike, as this will help you prevent the side of the tyres from getting cracks.
3. Nuts and bolts: Ensure all the nuts, bolts and screws of your bike are in place and adequately tight after a certain period regularly. As screws loosen up, the parts also loosen up, causing irritating noises while riding the bike and possibly damaging the position, causing friction with keeping a few extra nut bolts in stock for a bad day.
4. Brakes: In the case of riders who like to go considerably fast, it is critical to make sure brakes are like they should be. When you are required to hit the brakes and they take time after being applied, to have the effect, it is time to tighten them. V brakes can also be drawn by unfitting the brake wires, pulling them ahead as required and tightening the brake wires again. Make sure you leave the wire needed enough to hit the brakes comfortably without damaging the brake wires by putting too much pressure on the same. Along with doing these required steps, it is also recommended to understand your bike's brakes by getting acquainted with the urgency of the brakes and applying the brakes accordingly.
Also, ensure that the brake pads and the braking surface are kept clean and free of oil and dirt. As the ground will cause the brake pads to wear, lowering the brakes' stopping ability, the oil may cause the brake pad surface to smoothen more than required, thus making the brakes, not function as needed.
5. Did you know: Interesting facts, figures, and things to know about the kids' bicycle
5.1 Before the word ‘bicycle’ become popular (coming from the French word ‘bicyclette’), bikes were typically called ‘velocipedes’.
5.2 In the 1920s – bicycle makers began to develop smaller versions for children to ride.
5.3 One of the most famous bicycle races in the world is the "Tour de France". It began in 1903 and is one of the most challenging tests of endurance.
5.4 Bicycles save over 238 million gallons of gas every year.
5.5 In 2011, Austrian racing cyclist Markus Stöckl drove an ordinary bicycle down a volcano hill. He attained a speed of 164.95 km/h.
6. Our Picks: How we picked the best kids' bicycle
We have selected our top 7 best kid’s bicycle while considering size, kid’s age, safety, fashion, etc. However, frame material, the wheel type, and brake systems have been our top priority to rank them in order! To assists, you furthermore, here are our product reviews.
We have selected our top 7 best kid’s bicycle while considering size, kid’s age, safety, fashion, etc. However, frame material, the wheel type, and brake systems have been our top priority to rank them in order! To assists, you furthermore, here are our product reviews.
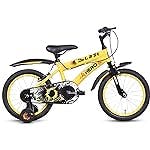
6.1 Hero Blast 16T: Pick 1
-
Why?
-
You get the cycle in a semi-assembled condition, so you will need to bend your bike and assemble it before use. You get an Allen key and spanner, a mudguard, trainer wheels and chain cover in the box for the same.
-
The tire size is 16 inches, and the frame size is 12 inches which are ideal for kids.
-
This bike is perfect for kids of 5 to 6 years and has a minimum height of 3 feet to a maximum of 4 feet.
-
Brakes are well equipped with calliper brakes, and the bike is a single-speed bike.
-
The frame material is steel, complete with a rigid suspension.
-
-
Why?
-
You get the cycle in a semi-assembled condition, so you will need to bend your bike and assemble it before use. You get an Allen key and spanner, a mudguard, trainer wheels and chain cover in the box for the same.
-
The tire size is 16 inches, and the frame size is 12 inches which are ideal for kids.
-
This bike is perfect for kids of 5 to 6 years and has a minimum height of 3 feet to a maximum of 4 feet.
-
Brakes are well equipped with calliper brakes, and the bike is a single-speed bike.
-
The frame material is steel, complete with a rigid suspension.
-
6.2 Firefox Skurrerz 14T: Pick 2
-
Why?
-
The Firefox Skurrerz is built on a kid-specific steel frame which is light and durable. The structure offers good stability.
-
The bike is equipped with a training wheel, crash pads on the handlebar & non-toxic paints as a safety measure.
-
It is equipped with V-brake for powerful braking and a one-piece crank for extra strength.
-
The cycle is delivered in semi-assembled condition (85% assembled).
-
The tire size is 14 inches and the frame size is 9 inches.
-
The bike is ideal for kids who are 3-5 years old.
-
The rider's height should be 2.5 feet to 3.6 feet.
-
-
Why?
-
The Firefox Skurrerz is built on a kid-specific steel frame which is light and durable. The structure offers good stability.
-
The bike is equipped with a training wheel, crash pads on the handlebar & non-toxic paints as a safety measure.
-
It is equipped with V-brake for powerful braking and a one-piece crank for extra strength.
-
The cycle is delivered in semi-assembled condition (85% assembled).
-
The tire size is 14 inches and the frame size is 9 inches.
-
The bike is ideal for kids who are 3-5 years old.
-
The rider's height should be 2.5 feet to 3.6 feet.
-
6.3 Firefox Alfa 16T: Pick 3
-
Why?
-
The Firefox Alfa is built on a kid-specific full-suspension steel frame which is light and durable. The structure offers good stability.
-
This bike equipped with V-brake for power braking, seat post with QR for easy adjustment.
-
The Alfa comes with a ZOOM front suspension with 40mm travel and steel 750LB rear suspension.
-
The cycle is delivered in semi-assembled condition (85% assembled).
-
The tire size is 16 inches and the frame size is 12 inches.
-
The bike is ideal for kids who are 7-9 years old.
-
The rider's height should be 3.6 feet to 4.2 feet.
-
The bike comes with a reflector and dual suspension.
-
-
Why?
-
The Firefox Alfa is built on a kid-specific full-suspension steel frame which is light and durable. The structure offers good stability.
-
This bike equipped with V-brake for power braking, seat post with QR for easy adjustment.
-
The Alfa comes with a ZOOM front suspension with 40mm travel and steel 750LB rear suspension.
-
The cycle is delivered in semi-assembled condition (85% assembled).
-
The tire size is 16 inches and the frame size is 12 inches.
-
The bike is ideal for kids who are 7-9 years old.
-
The rider's height should be 3.6 feet to 4.2 feet.
-
The bike comes with a reflector and dual suspension.
-
6.4 Beetle Candy 14T: Pick 4
-
Why?
-
The cycle is delivered in semi-assembled condition (85% assembled). The manufacturer provides with Allen key and spanner, a mudguard, trainer wheels and chain cover for assembling the bike.
-
The wheel size is 14 inches and the frame size is 9 inches.
-
It is a unisex cycle and fit for kids who are 4-7 years old. Moreover, the kid’s height should be between 2 feet 6 inches to 3 feet 6 inches.
-
It has both a front brake (V-brakes) and the rear brake (V-brakes).
-
It is a single-speed cycle.
-
-
Why?
-
The cycle is delivered in semi-assembled condition (85% assembled). The manufacturer provides with Allen key and spanner, a mudguard, trainer wheels and chain cover for assembling the bike.
-
The wheel size is 14 inches and the frame size is 9 inches.
-
It is a unisex cycle and fit for kids who are 4-7 years old. Moreover, the kid’s height should be between 2 feet 6 inches to 3 feet 6 inches.
-
It has both a front brake (V-brakes) and the rear brake (V-brakes).
-
It is a single-speed cycle.
-
6.5 R for Rabbit Tiny Toes: Pick 5
-
Why?
-
It is a perfect bicycle for 3 to 5 years old kids.
-
The cycle is highly durable.
-
You get the best usage for an extended period.
-
The cycle comes 95% assembled.
-
It is ISO 8098 certified.
-
It has a rear disk brake.
-
It has an adjustable seat and handlebar.
-
-
Why?
-
It is a perfect bicycle for 3 to 5 years old kids.
-
The cycle is highly durable.
-
You get the best usage for an extended period.
-
The cycle comes 95% assembled.
-
It is ISO 8098 certified.
-
It has a rear disk brake.
-
It has an adjustable seat and handlebar.
-
6.6 Speed Bird Cycle 14T: Pick 6
-
Why?
-
This bike is designed especially keeping in mind the high durability, and the cycle is specially designed for the kid.
-
The cycle has an attractive carrier and great extent basket.
-
It has mig welded steel frame and extra raised bar soft grips.
-
The bike also has moulded anti-skid body pedal with a full chain cover.
-
The moulded rims are unbreakable.
-
-
Why?
-
This bike is designed especially keeping in mind the high durability, and the cycle is specially designed for the kid.
-
The cycle has an attractive carrier and great extent basket.
-
It has mig welded steel frame and extra raised bar soft grips.
-
The bike also has moulded anti-skid body pedal with a full chain cover.
-
The moulded rims are unbreakable.
-
6.7 Qualtiment Scooter: Pick 7
-
Why?
-
Trusted by most parents and loved by all kids, this cycle is designed to let your kids enjoy fun and safe riding.
-
It combines saftey and all modern features to make this scooter a popular parent’s choice.
-
It is easy to carry due to the foldable design.
-
The 3-wheel, self-balancing scooter provides a quiet and smooth ride while offering the necessary stability and support for your little one. It features PU flashing wheels that light up while moving, and the front tires are pretty big, so it runs smoothly even on surfaces that are uneven and bumpy.
-
The scooter is equipped with a low-to-the-ground, grippy and extra expansive deck that is large enough to fit both feet.
-
It uses the LEAN-TO-STEER technology, which means the scooter is controlled by leaning rather than turning the steering wheel; this design helps your child develop balance skills, coordination and more.
-
The scooter has a rear brake. Checkout reviews and comparison of best kids tricycle, best baby car seats, best baby strollers, best baby carriers, best kids cycles in India.
-
-
Why?
-
Trusted by most parents and loved by all kids, this cycle is designed to let your kids enjoy fun and safe riding.
-
It combines saftey and all modern features to make this scooter a popular parent’s choice.
-
It is easy to carry due to the foldable design.
-
The 3-wheel, self-balancing scooter provides a quiet and smooth ride while offering the necessary stability and support for your little one. It features PU flashing wheels that light up while moving, and the front tires are pretty big, so it runs smoothly even on surfaces that are uneven and bumpy.
-
The scooter is equipped with a low-to-the-ground, grippy and extra expansive deck that is large enough to fit both feet.
-
It uses the LEAN-TO-STEER technology, which means the scooter is controlled by leaning rather than turning the steering wheel; this design helps your child develop balance skills, coordination and more.
-
The scooter has a rear brake. Checkout reviews and comparison of best kids tricycle, best baby car seats, best baby strollers, best baby carriers, best kids cycles in India.
-